Tuesday, March 29, 2011

Origami Rooster 1

Day 117 - Origami Rooster 1

Model : Origami Rooster 1
Design : Traditional
Complexity : Simple
Folding Instruction
    Diagram : www.laurenstringer.com
    Photo Instruction : www.laurenstringer.com
Paper : 3*3 Inch one side coloured square paper

This is a simple model .Easy and fast.I suppose a good one for making cards.

For instructions I would say the diagram is easier to follow than the photo instruction as it is more detailed.

Monday, March 28, 2011

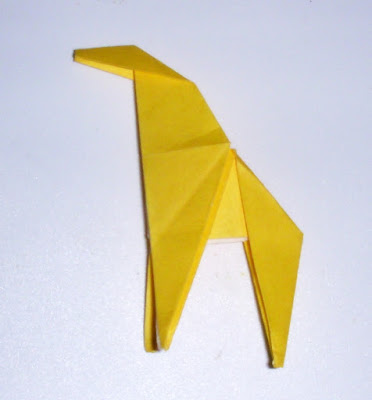
Origami Giraffe

Day 116 - Origami Giraffe


Model : Origami Giraffe
Design : Traditional
Complexity : Simple
Folding Instruction
    Diagram : www.laurenstringer.com
    Video : Tavin
    Book : Super Quick Origami Animals by Nick Robinson
Paper : 3*3 Inch one side coloured square paper

This is a traditional origami model.It starts with origami bird base.I followed the video on Tavin's Channel This video is of 8 minutes but the actually folding after the bird base starts at 2.50 minutes and ends by 5.20 minutes. It's a nice tutorial and easy to follow.


The final model had pointed face and pointed legs which I have squared a bit because I thought it would look better.

Video:-

Sunday, March 27, 2011

Origami Elephant

Day 115 - Origami Elephant


Model : Origami Elephant
Complexity : Simple
Folding Instruction
    Video : Tavin
Paper : 4.5 Inches

I found a lot of origami elephant models on internet.Some were simple and some complex.Simple once seemed too abstract and for the complex I wasn't in a mood to try out.Finally I found this model on Tavin15's channel on youtube.

This is easier than others but not abstract and is a 3D model.Use a thicker paper than usual but not very thick paper as the final intricate folds become tougher.

While folding the legs be bit careful to keep the hind and fore legs in the same level.


Video:-

Saturday, March 26, 2011

Origami turtle Robert J Lang

Day 114 - Origami Turtle by Robert J Lang


Model : Origami Stealth Fighter
Design By : Robert J Lang
Website : langorigami.com
Complexity : Medium
Folding Instruction
    Video : Marigami
        : Jonakashima
    Book : Origami Design Secrets by Robert J.Lang
Paper : 4.5 Inches

Okay another one from the same book Origami Design Secrets by Robert J.Lang.This time it's a turtle.Though my first attempt of the turtle looks really messed up but I feel it was fair enough for the first attempt.

There are a few online instructional videos on the youtube channel by Marigami and Jonakashima.You can follow either of them.

Accurate folding is really a big requirement for this model and yes start with a fairly big square piece of paper. Once you have folded the tail and the legs the important part starts that is shaping the turtle shell and puffing the head .The instruction video may seem to be too fast at this point and you may feel frustrated ( Atleast I felt so when mine was not turning up properly) but be patient and follow the instructions carefully.Be careful while puffing the head and dont rip it.

Video:-

Friday, March 25, 2011

Origami Stealth Fighter

Day 113 - Origami Stealth Fighter

Model : Origami Stealth Fighter
Design By : Robert J Lang
Website : langorigami.com
Complexity : Medium
Folding Instruction
    Video : Tavin15
    Book : Origami Design Secrets by Robert J.Lang
Paper : 4.5 Inches

This is my first flying object model to fold and I am happy that I tried a Robert J lang model.All thanks to the wonderful tutorial by Tavin15 on youtube.

As it is a model by Robert J lang many may think it would be quite tough but no its easy and the tutorial makes it even easier.

You can use a single side coloured paper for the model even though the tutorial speaks of using a double side coloured paper for the model.For single side coloured paper start with white side up.The model starts with W Boat base .

Video :-

Thursday, March 24, 2011

Origami Sheep

Day 112 - Origami Sheep


Model : Origami Sheep
Design By : Traditional
Complexity : Simple
Folding Instruction
    Diagram : Origami Club - Sheep
    Animation : Origami Club - Sheep Animation
    Video : Japonyol
Paper : 3*3 Inch 1 side coloured square paper

This model would look best with the standard origami paper one side coloured and one side white.You would need a pen to draw the eyes and the nose.

This is a 2D model but it can stand if you slightly stretch open the first two legs.

Video :-

Wednesday, March 23, 2011

Origami Seal - 2

Day 111 - Origami Seal 2

Model : Origami Seal
Design By : Gerwin Sturm
Complexity : Simple
Folding Instruction
    Diagram : Scarygami.net
    Book : Origami: Kreative Falt-Ideen
Paper : 3*3 Inch 1 side coloured square paper


This is one more of the origami seal models.This model is by Gerwin Sturm.The model is almost similar to the traditional origami seal model with little variation here and there to give it a better shape than the abstract shape it had in the traditional model.

We push the trinagular middle part in and towards the tail we fold a little to give it shape.Also you will notice that the tail is not up but folded in a zia zag manner.

Tuesday, March 22, 2011

Origami Seal - 1

Day 110 - Origami Seal - 1

Model : Origami Seal
Design By : Traditional
Complexity : Simple
Folding Instruction
    Diagram : Origami Seal
        : Origami Island
    Video : Japonyol
Paper : 3*3 Inch 1 side coloured square paper


It's a cute little sea creature traditional model starting with a fish base.

Its a 3D standing model but looks a bit abstract.You can draw the eyes I didn't draw because I felt it looks better otherwise.

Video:-

Monday, March 21, 2011

Origami Tsuru with legs

Day 109 - Origami Tsuru with legs

Model : Origami Tsuru with legs
Design By :
Complexity : Simple
Folding Instruction
    Video : Jonakashima
Paper : 4.5 Inches


Origami Tsuru with legs is not a pure origami model as you would need to use scissors to cut to make the legs but I still feel it's a nice simple model .I would say it's a variation of standard origami crane.

It starts with a bird base and with little manipulation of the tail you get the legs of the tsuru.I would suggest to use a stiffer paper for the model else it won't stand on it's own ( as in my case ).

Video:-

Sunday, March 20, 2011

Origami four leaf clover

Day 108 - Origami four leaf clover


Model : Origami four leaf clover
Design By : Gerwin Sturm
Complexity : Medium
Folding Instruction
    Diagram : Origamiaustria
    Video : Happypuppytruffles
    Book : Origami: Kreative Falt-Ideen
Paper : 4.5 Inches

I picked this four-leafed clover from Heather's daily origami video's.
This model can be used for celebrating St. Patrick's Day or some decoration leaf.

Though it looks simple but it's pretty tough.The initial folds are easy but as you proceed to give shape to the leafs it becomes complicated.You need to be really patient while you shape the leafs else you may rip the paper.

One more suggestion if to use a fairly large paper for the first attempt coz towards the end you will have to multi fold certain places.

Video :-


Saturday, March 19, 2011

Origami 5 petal lily

Day 107 - Origami 5 Petal Lily


Model : Origami 5 Petal Lily
Design By :
Complexity : Medium
Folding Instruction
    Video : joostlangeveld
Paper : 3*3 Inch one side coloured square paper

One more of the lily patterns.I have tried the traditional lily,3 petal lily,five petal lily out of pentagon .This one is a 5 petal lily out of square instead of pentagon.

Though the basic steps are almost the same but there is a little variation which brings out the 5th petal .I would suggest to use both side coloured paper instead of the one side coloured paper as the fifth petal exposes the other side which you can see in the flower I have folded.

The fold towards the end when you shape the flower to open it is bit tough and if you don't do it carefully it rips (as mine has ripped a bit) else till you bring out the fifth petal it is pretty much easy.

Video :-

Friday, March 18, 2011

Origami Anchusa (Italian Bugloss)

Day 106 - Origami Anchusa (Italian Bugloss)


Model : Anchusa (Italian Bugloss)
Design By : Yoshihide Momotani
Complexity : Medium
Folding Instruction
    Video : Happypuppytuffles
Paper : 3*3 Inch one side coloured square paper

Anchusa is a small radially symmetrical flower,sapphire blue in colour and it retains color a long time. The plants show numerous flowers with 5 sepals, united at their bases, and 5 petals forming a narrow tube facing upwards. The flowers grow in several axillary cymes, simple or branched, or are clustered at the end. (Source : Wikipedia)


The Origami Anchusa is 4 petaled and isn't tubular,but still it's a cute little flower.It is made out of square piece of paper.A patterened paper would give better flower I believe yet the normal one side coloured paper isnt that bad either.Though the initial folds are easy but the folds towards the end where you finally give shape to flower petals are clumsy.I got confused towards the end.I felt the video could have explained it bit better.

Video :-

Thursday, March 17, 2011

Origami Turtle

Day 105 - Origami Turtle


Model : Origami Turtle
Design By : Traditional
Complexity : Medium
Folding Instruction
    Diagram : The Paper Fold
    Video : origamiinstructions.blogspot.com
Paper : 3*3 Inch one side coloured square paper

This is a traditional origami turtle.The final model looks somewhat similar to Origami Chubby sparrow but it's not the same.

I found the diagrams bit tricky but the video instructions are useful.The tough part is where you pull the legs to puff the body of the turtle.One needs to be really careful not to rip the paper.

The video uses a patterned paper for the turtle which makes the turtle turn out really nice.

If you are searching for similar patterned paper then may be you can check this etsy shop called origamibijou or if you want the turtle and dont want to fold them then you may purchase them from etsy shop by prettymuchdana.


Video :-


Wednesday, March 16, 2011

Origami Snail - 2


Day 104 - Origami Snail - 2

Model : Origami Snail
Design By : Toshie Takahama
Complexity : Medium
Folding Instruction
    Video : Happypuppytruffles
Paper : 4.5 Inches


Another of those snails.This snail has a tail too :).Coming to folding details.The folding starts with square base and further the foldings are similar to origami iris fold .The foldings can be divided into 3 parts.
  1. Folding to get the head and antenna.
  2. Getting the tail.
  3. Expanding/opening the shell.This is bit tricky be careful else it would rip off.I actually was careless and it ripped.


Video:-

Tuesday, March 15, 2011

Origami Dove

Day 103 - Origami Dove


Model : Origami Dove
Design By : Alice Gray
Complexity : Simple
Folding Instruction
    Video : Danbergam
Paper : 3*3 Inch white square paper

Origami dove is a traditional model.It resembles the peace dove so it can be used for spreading the message of peace just that you need to add an olive branch.

Though it's a simple model I messed up with the first attempt because I skipped the first step and created a triangle base.

Here is a video on the youtube channel by danbergam.


Video:-

Monday, March 14, 2011

Origami carnation

Day 102 - Origami Carnation


Model : Origami Carnation
Design By : Grimmhobby
Complexity : Simple
Folding Instruction
    Video : Happypuppytruffles
Paper :3*3 Inch one side coloured square paper

Origami carnation is simple on complexity level and is similar to origami buttonhole flower except the last step where you fold the petal tips in exposing the otherside of the paper else I feel it's the same.


I found this model on the youtube channel by Happypuppytruffles. Incidently she too is folding an origami model a day so going forward I think I would be following a few of her models here.

Video :-

Sunday, March 13, 2011

Origami snail - 1

Day 101 - Origami Snail - 1

Model : Origami Snail
Design By : Traditional
Complexity : Medium
Folding Instruction:
    Diagram : The fold
    Video : Super1600
Paper : 4.5 Inches


While folding the origami heart ring yesterday I found this paper napkin origami snail instruction on the YouTube channel by super1600.

Origami snail starts with a square base and going ahead the folds seem similar( not the same though)to the origami bird base.

The Instructions can be divided into 2 parts.First part explains to get the head and antenna and the second part to blow the shell.

One needs to take care while puffing the shell else it would rip the paper.The head and antenna folding is bit cumbersome.The instructions on the video are good but due to the use of the paper towel and white colour the instructions are not that clear at certain points.You need to watch the video carefully to understand how the antenna and the head is made.

Video Instructions:-


Saturday, March 12, 2011

Origami Heart Ring

Day 100 - Origami Heart Ring


I know I should have folded this in the valentines week but I guess I didn't think of it then.

Well this model is really simple and easy to fold.You need a square sheet of paper,both one side coloured or both side coloured would do but contrast shade would be better.

The folding is similar to origami fan or origami napkin butterfly folding.Interesting little piece to fold and to be used as accessories.

I found this wonderful video on the youtube channel by super1600.


It's a 5 mins video which explains the folds in detail.

The instructions can be divided into three parts.first part of instructions are to get the pleats which would eventually turn out to be the ring,the next set of folds are for the heart part and the final set of instructions is to tuck the ends of the ring and give it the round ring shape.

Friday, March 11, 2011

Origami Pluto Kusudama

Day 96,97,98,99 - Origami Pluto Kusudama

Hmm... This one took me 4 days to complete. This kusudama is named “Pluto Kusudama” in YAMAGUCHI Makoto’s book Kusudama Ball Origami.It needs to create 40 module for the kusudama.Each module is made of a square piece of paper which needs to be folded - opened - reverse folded.The reverse folding on the creases made is the only part where you may face difficulty.The modules are held together with string.You can also use glue but I feel string is better.

Few units of the Pluto Kusudama

I have used neon coloured Post-it Notes for the model.I would suggest to use both side same coloured or contrast coloured paper for the model.


If the points of the modules are folded inside then it becomes Venus Kusudama.The folds are some what similar to the units of Origami Butterfly kusudama or you may find some similarity with the origami iris/lily

Folding Instructions:-

Diagram:-
You can find the diagram on this Portuguese blog ocantinhodacris-artes .

Video:-
On the youtube channel by 1petiteSorciere you can find instruction video for the module of origami pluto kusudama.


Book:-

Monday, March 7, 2011

Origami Star by Jared Needle

Day 95 - Origami star by Jared Needle


This is a typical origami Christmas star .It is designed by Jared Needle.You need a single piece of square paper to start.I have used a white piece of 3*3 inch square paper but would suggest to use a bigger paper as towards the end due to multiple folds certain parts folding becomes difficult .Actually I spotted this design on YouTube channel EzOrigami .The instruction is in two parts and too detailed.There the opening picture is of a white star which made me use a white paper for the star.


This star too starts with a origami bird base and a sink at the top.The first part of the video instruction upto 7 mins speaks how to get the origami bird base and creating the top sink fold,it's after the 7 mins of first part and the second part where the actual folding takes place.

Folding Instructions:-
Video:


Part 1:-


Part 2:-

Sunday, March 6, 2011

Origami star - 3

Day 94 - Origami star-3

Another star in the series.Though I had not planned any theme for the week but it's turning out to be a week of star folding.

As I don't know the name of the stars or any specific author I have named them as star 1,2,3....so on.This one is the 3rd in the series( not counting lucky star and 8 point star).


Its easy to fold and a simple model.It starts with bird base.You can use one side coloured paper.Things to take care while folding this model:-
  1. The folding includes a sink at the top.The sinking needs to be done carefully or it would rip off the paper.

I found the folding instruction on youtube channel Origami768.The video is really detailed and may seem boring to many but for beginners it is good.

Folding Instructions:-
Video:-

Saturday, March 5, 2011

Origami Kusudama (by Nina Ostrum)

Day 93 - Origami Kusudama (Nina Ostrum)

This is a simple,modular origami model designed by Nina Ostrum.It needs 6 units for the module.

Units of the kusudama

I have used 3*3 inch one side coloured paper for the model but I would suggest/advice to use a double side coloured paper as the final model after assemblage exposes the other side of the paper.

The assembly of the units does not require glue as the pockets made by the fold are good enough to hold the units together properly.

Things to take care while folding this model.
  1. A bit thicker paper to be used.
  2. Double side coloured paper.
  3. Sink of the triangle top needs to be done carefully else it would tear .
Origami Nina Ostrum kusudama
Folding Instructions:-

Diagram:-
Origaminut.com

Video:-

The following video on the youtube channelorigaminut is good enough to follow.


If you are not okay with this tutorial you may try the tutorial on the youtube channel barbabellaatje

Friday, March 4, 2011

Origami star - 2

Day 92 - Origami Star - 2

Origami 4 point star is made of a single square sheet of paper.You can use both single side coloured or duble side coloured sheet.I have used a single side coloured square sheet of dimension 3*3 inch.

Front view of the star

The model starts with origami bird base.Though the model is simple there are certain places where you need to take care like:-
  1. Sinking of the top triangle of the bird base to get the centre of the star.If yu are nt careful it may tear up.
  2. Folding in the back where you need to do the small folds between the arms of the star .If you are making a small star it really difficult to fold this part , so I would suggest the beginners to start with a fairly large paper.

Backside view of star

Here is a stop-motion video on channel Origami768 .Also you can check the blog by the same author called Origami where you can find some more origami tutorials.


Thursday, March 3, 2011

Origami star - 1

Day 91 - Origami star

One more design of origami star.This one needs 2 square pieces of paper.You can use both single side coloured or double side coloured papers.


I have used Post-it paper for this model.The model is created by František Grebeníček.

The folds are simlar to the origami decoration - variation 1 fold I tried earlier.This one has a little varation.The varations are:-
  1. You need not open the folds to form the petals.
  2. Fold the backside of the decoration to create the pockets.

The two units with back and front views

The two pieces/decoration pieces can be held together by the pockets made by the folds but its not that reliable so you may use glue to keep the units together.

Another arrangement of the 2 units

Folding Instruction:-

Diagram :-
Origami star

Video :-

Wednesday, March 2, 2011

Origami Cherry Blossom

Day 90 - Origami Cherry Blossom


This is a kirigami model rather than an origami model.Basically the flower needs a pentagon to start with.The instructions on the Origami-club starts with a square piece of paper.

You need to fold the square to get a pentagon and on the folds to get the pentagon you will have to cut it into the flower shape.

It's a good one for greetings or decorations.The instruction on origami club also speaks of folding branch for the cherry blossoms.

Folding instructions:- Origami-club


Tuesday, March 1, 2011

Origami Ray

Day : 89
Model : Origami Ray Fish
Folding Instruction :
    Photo Instructions Origami-club
    Video Origami-club
    Video Origami-club
Paper : 3*3 Inch one side colored origami paper


Another of the easy models from origami club.I suppose its the easiest models of ray.If you are wondering what is ray fish then you may check on Batoid on wikipedia.Ray fishes are closely related to sharks.

The above ray is folded using 3*3 inches one side coloured square paper.Though it doesnot look that similar to original ray but it is somewhat similar.Once you draw the eyes the origami ray looks really funny and can become a good cartoon character especially if you are drawing it graphically as I have done.

Here's a pic of original Leopard Ray in the Dubai Aquarium.