Showing posts with label Origami Birds. Show all posts

Sunday, January 1, 2017

Origami Wind Chime/Mobile


This is one of the projects which took a lot of time for collecting material , folding and final assembly especially when you have inquisitive kids around you who love to pick the finished parts :).

Requirement:-
1.  Origami Squares  355  30*10 Kusudama and 55 for the cranes 
2.  Embroidery ring  Plastic ring to keep the weight of final product low 
3.  Ribbon  1 Pack  Approx 12 m 
4.  Fishing/Nylon wire  As required 
5.  Metal Beads  10 
6.  Glue 

This origami mobile has ten Electra kusudama which is stringed to the plastic mobile ring using nylon fishing wire.Each kusudama consists of 30 units.So a total of 300 units goes in for kusudama.

300 pieces of paper to be folded

Few folded units

Work in Progress

All the 10 completed kusudamas 
Then I folded 55 cranes to decorate the strings.I used a metal bead at the bottom of each kusudama to give a little weight to the nylon string.If you wants some sweet sound from the mobile then add a few small bells/ghungroo. So first a bead,then kusudama,then paper crane (number increasing by one each time) stringed to the plastic embroidery ring at equal gaps.To keep the cranes at equal distance on the string and not drop down you can use a glue drop from glue gun or tie knots.

Initial testing for gaps between strings and length of string.
After arranging the strings on the ring and securing them I covered the ring with braided ribbon.

Sunday, May 1, 2011

Origami Penguin by Jo Nakashima

Day 149 - Origami Penguin by Jo Nakashima

Model : Origami Penguin by Jo Nakashima
Design : Jo Nakashima
Complexity : Difficult
Folding Instruction
    Video : Jo Nakashima
Paper :15 * 15 cm one side coloured square

One more from Jo Nakashima.A wonderful 3D penguin .This one is bit difficult but not too tough.The tough part is the precrease.One needs to have a lot of patience ( of course I have very little patience which is evident from the penguin I have folded).

Only suggestion is do start with a big piece of paper else it becomes difficult to follow the creases.


Monday, April 18, 2011

Origami Humming Bird

Day 137 - Origami Humming Bird

Model : Origami Humming bird
Design : Andrés Plazas
Complexity : Simple
Folding Instruction
    Video : Youtube channel Pozamansa
Paper : 3*3 inch one side coloured square

I have seen a lot of origami humming birds but the best one is the one by Robert J lang.Though that model looks very tough to me I found this simple humming bird on Origami Spirit.

This Origami Humming Bird model is designed by Andrés Plazas of Colombia.It starts with an origami bird base.Basically its the same old crane but with few manipulations you can get the humming bird.


Video :-


Thursday, April 7, 2011

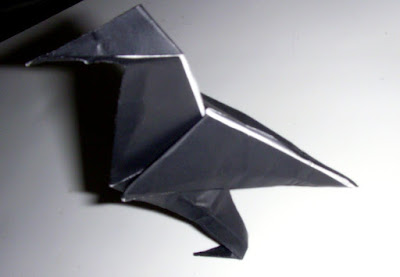
Origami Raven

Day 126 - Origami Raven

Model : Origami Raven
Design : Tavin
Complexity : Simple
Folding Instruction
    Diagram : Tavin
    Video : Tavin
Paper : 4.5 Inches

Another bird model but this one looks a bit realistic even though mine didn't turn out to be that good.Thats because I refolded it which made the paper to loose it's strength and thus the bird couldn't stand.

One suggestion is start with white side up.


Video:-

Monday, April 4, 2011

Origami Baby bird

Day 123 - Origami Baby Bird

Model : Origami Baby Bird
Design : MaMa to Asobou: Tanoshii Origami
Complexity : Simple
Folding Instruction
    Video : Happytruffles
Paper : 3*3 Inch one side coloured square paper

It's origami and a little bit of kirigami as you need to use scissors to cut towards the end of the model.It's intial folds are similar to many of the bird models.


Doesn't my fold look bit similar to the video once :) just that I forgot to fold the tail up.I felt it would help stablises the bird to stand.

Video :-


Tuesday, March 29, 2011

Origami Rooster 1

Day 117 - Origami Rooster 1

Model : Origami Rooster 1
Design : Traditional
Complexity : Simple
Folding Instruction
    Diagram : www.laurenstringer.com
    Photo Instruction : www.laurenstringer.com
Paper : 3*3 Inch one side coloured square paper

This is a simple model .Easy and fast.I suppose a good one for making cards.

For instructions I would say the diagram is easier to follow than the photo instruction as it is more detailed.

Monday, March 21, 2011

Origami Tsuru with legs

Day 109 - Origami Tsuru with legs

Model : Origami Tsuru with legs
Design By :
Complexity : Simple
Folding Instruction
    Video : Jonakashima
Paper : 4.5 Inches


Origami Tsuru with legs is not a pure origami model as you would need to use scissors to cut to make the legs but I still feel it's a nice simple model .I would say it's a variation of standard origami crane.

It starts with a bird base and with little manipulation of the tail you get the legs of the tsuru.I would suggest to use a stiffer paper for the model else it won't stand on it's own ( as in my case ).

Video:-

Tuesday, March 15, 2011

Origami Dove

Day 103 - Origami Dove


Model : Origami Dove
Design By : Alice Gray
Complexity : Simple
Folding Instruction
    Video : Danbergam
Paper : 3*3 Inch white square paper

Origami dove is a traditional model.It resembles the peace dove so it can be used for spreading the message of peace just that you need to add an olive branch.

Though it's a simple model I messed up with the first attempt because I skipped the first step and created a triangle base.

Here is a video on the youtube channel by danbergam.


Video:-

Sunday, February 27, 2011

Origami Penguin

Day 87 - Origami Penguin


This is a 2D model.Origami penguin is a simple model.As it's a 2D model you can use it for making greeting cards.

I have used a 3*3 inch one side black coloured paper.As penguins are black in colour I suppose its proper to use a piece of black paper instead of other colours.

Penguins are such cute animal but my origami penguin is not that cute as the folds dint come that good.

Folding instructions :- origami club

Wednesday, February 23, 2011

Origami prison break swan variation

Day 83 - Origami prison break swan variation


Yesterday I tried the prison break swan.I found another variation of the prison break swan byBarbabellaatje on the channel "How to make these !!".


I liked this model better than the previous one.The instructions in the video are quite clear .The only suggestion is have patience during the precreasing of the paper in the instruction.

Starting with a larger piece of square sheet would be better for beginners.

Tuesday, February 22, 2011

Origami prison break swan

Day 82 - Origami prison break swan


Before you start wondering why this model is called prison break swan,here is a small intro to it.Prison Break is a TV show in which one of the characters (played by Michael Scofield) folds this origami swan thus the name "Prison break swan".

I found this video tutorial by Barbabellaatje on the channel "How to make these !!".
The instructions are quite clear so its not that difficult to follow.Its a stop motion video.


Diagram:-
Martik Panosian's Blog

Friday, February 18, 2011

Origami twin swan

Day 78 - Origami Swan parent and child

This is a twin swan made out of single piece of square paper. A lovely model.It is similar to the origami swan just that you fold the tail and wings into the small child swan.

Here is the photo instruction:-

Step 1:-
Fold diagonally to crease and open.


Step 2:-
Fold the corners to the crease as shown below.

Step 3:-
Fold the top corners to the diagonal crease as shown below.


Step 4:-
Fold in half .


Step 5:-
Pocket fold to get the neck of the parent swan.


Step 6:-
Fold the tail part along the black line to get the child swan.


Step 7:-
Pocket fold along the black line to get the neck part of the child swan.


Step 8:-
Fold along the black lines on the neck to get the head and beak


Step 9:-
Draw the eyes to complete and done.


Folding diagram and animation is available at origami-club.

Friday, February 11, 2011

Origami chicken born from egg

Day 73 - Origami chicken born from egg

Origami Chicken born from egg model is a cute little model.It is quite simple 2D model.It starts with a square base and has a few simple folds.Its perfect for easter greeting card making.

I have used a 3*3 inch one side yellow and one side white square paper.


Folding Instruction:-

Diagram and Animation:- Origami-club

Saturday, January 22, 2011

Origami Birds this week

Here is a pick of all the origami birds I folded this week .I feel the Ostrich and Chicken are the best in the lot.

Origami Swallow


Day 53 - Origami swallow


Origami swallow starts with origami bird base.It is better to use double side coloured paper (even though the final folds won't show the other side of paper) because the model needs a cut, which may expose the other colour.Thus its not pure origami but kirigami as cutting is involved.

But the model can be folded with single side coloured or double side coloured paper without much difference .The final model looks like 2D model as its flat but actually its a 3D model.

Easy to fold and could be used for kids DIY. Oh I feel with the past few post you can create a small farm of birds ....

Folding Instructions:-
Diagram:-
Origami club

Photo Instruction:-

Step 1:-
Start with Origami bird base. Fold the sides to the center line as shown below on both the sides.


Step 2:-
Turn it sideways.


Step 3:-
Do a pocket fold as shown below.


Step 4:-
Fold the upper flap to top as shown below.


Step 5:-
Fold the top flap to almost its half to make head and beak.


Step 6:-
Fold the top flap head part as shown below to get the beak.


Step 7:-
Turn the model.


Step 8:-
Cut the tail part and fold it as shown below and the Origami swallow is done


Friday, January 21, 2011

Origami Chicken

Day 52 - Origami chicken

It's a simple traditional model and starts similar to the origami wild duck,crow and ostrich model. I have used a white sheet for the purpose so the photo instructions may not be that clear.

Its 2D model so useful for greeting cards etc..

Folding instruction:-
Diagram:-
Origami club

Photo Instruction:-

Step 1:-
Fold the square diagonally to make a crease


Step 2:-
Fold to the center line


Step 3:-
Open the pocket and flatten sides to form traingle


Step 4:-
Fold the triangles so formed as shown below


Step 5:-
Fold in half and reverse the fold  of the 2 triangle forming the leg as shown below


Step 6:-
Further fold the leg to slim it as shown below


Step 7:-
Pocket fold to get the neck


Pocket fold to get the tail


Step 8:-
Pocket fold to get the head and the tail


Step 9:-
Fold to get the face and hood.


Step 10:-
Fold outwards as shown below at the neck to get a slimmer neck


Step 11:-
Paint  the hood red and draw an eye on the face of the chicken .