Looks like I would have to stop the daily origami posts but that doesnot mean I would stop foldng or posting.Its just that my schedules and work are not leaving me enough time for daily origami so I would have to stop it.
It was a wonderful time trying those models and I would continue but no regular updates .... :)
Showing posts with label Origami a day. Show all posts
Showing posts with label Origami a day. Show all posts
Monday, May 16, 2011
Friday, May 6, 2011
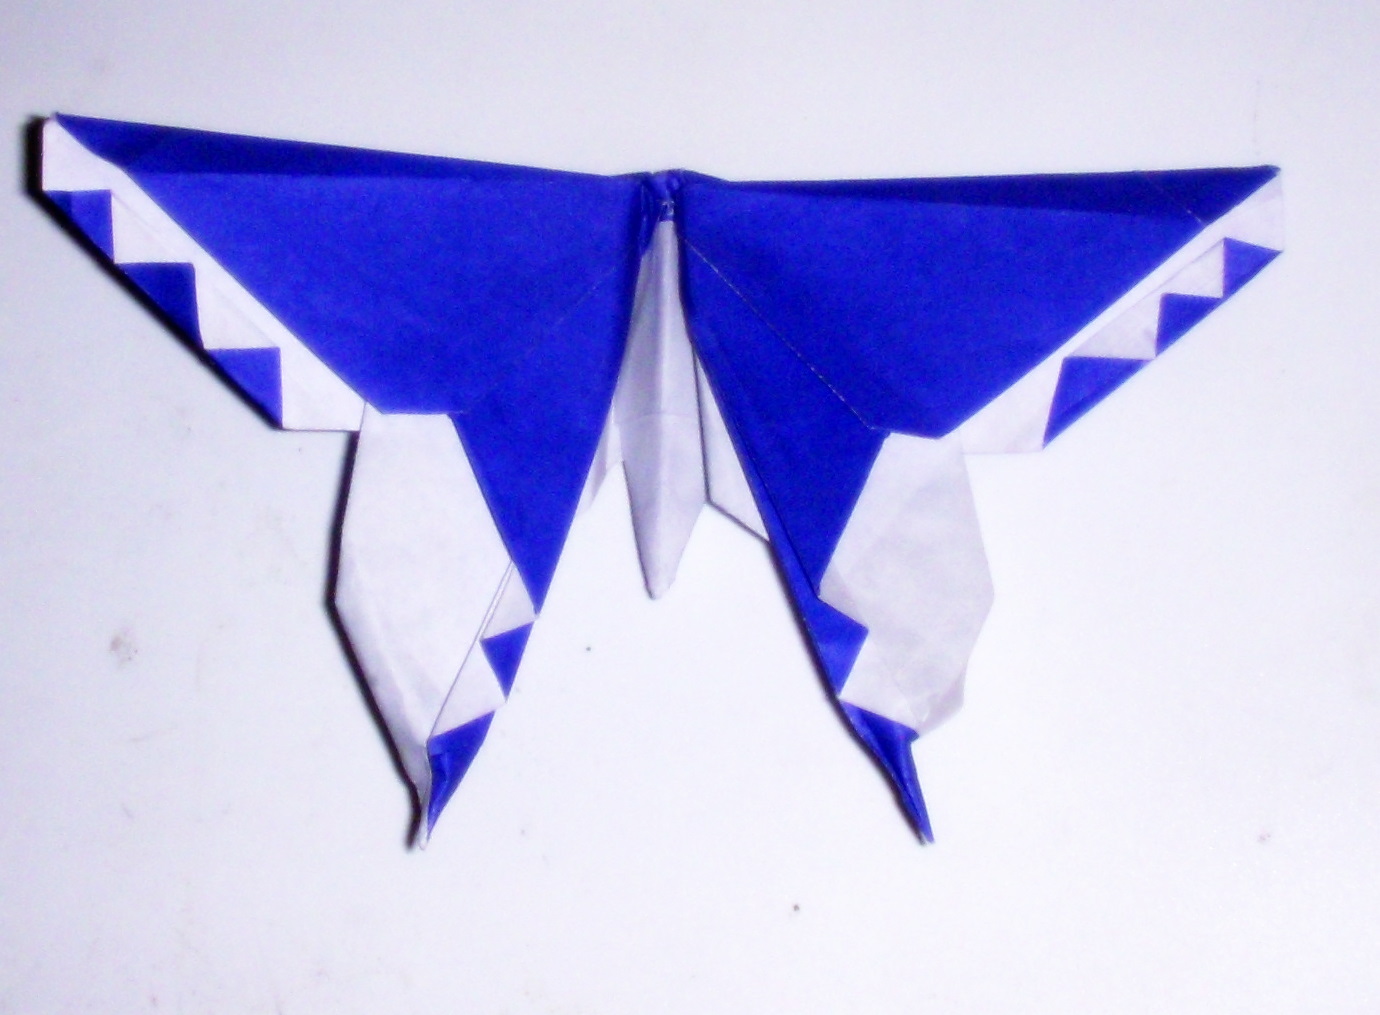
Origami Alexander Aztec butterfly - Design by Michael LaFosse
Day 154 - Origami Alexander Aztec butterfly - Design by Michael LaFosse

Another one of the Michael Lafosse butterflies.This one is really nice to look at with the zigzag pattern on the wings this pattern makes it look complicated too,but the fact is its not that complicated.At least you feel so once you have folded Alexander swallowtail Butterfly and Alice Gray Butterfly.
Alexander Aztec Butterfly is a mix of both the above butterflies.It starts with similar folds as the Alice Gray butterfly.
Few Notes:-
Video:-
| Model | : Origami Alexander Aztec butterfly |
| Design | : Michael LaFosse |
| Complexity | : Medium |
| Folding Instruction | |
| Book | : Advanced Origami |
| Video | : Part 1 Part 2 by elsix2006 |
| Paper | : 9*9 inch one side coloured paper. |
Another one of the Michael Lafosse butterflies.This one is really nice to look at with the zigzag pattern on the wings this pattern makes it look complicated too,but the fact is its not that complicated.At least you feel so once you have folded Alexander swallowtail Butterfly and Alice Gray Butterfly.
Alexander Aztec Butterfly is a mix of both the above butterflies.It starts with similar folds as the Alice Gray butterfly.
Few Notes:-
- Start with a fairly large paper for the first time.
- The butterfly looks better with contrast coloured paper .
- I felt the folding for the body of the butterfly are similar to Alice Gray Butterfly and the video by Orgamiancy for the same part s much clearer to understand.
- The Zigzag on the wings though look so complex but are actually easy.
- The part where you have to pull the paper in the upper wing for shaping it take care not to damage the model.
Video:-
Thursday, May 5, 2011
Origami Alice Gray Butterfly - Design by Michael LaFosse
Day 153 - Origami Alice Gray Butterfly - Design by Michael LaFosse

Earlier I had tried Michael LaFosse's Alexandar swallowtail butterfly .The instruction for this butterfly was available on the website by Michael LaFosse.
There were many more wonderful butterflies modeled by Michael Lafosse which I wanted to fold but could not find the instruction online neither I am that good at following the diagrams.Finally after one and a half years of folding Alexander swallowtail butterfly I found this video on YouTube by origamiancy for the model Alice Gray Butterfly by Michael Lafosse.The video was up by 2009 and I found it now that show how good I am at searching things on internet.
The instructions are quite clear.One thing to take care of ,is the instructions in the video starts with colour side up but if you want your butterfly to be colourful then start with White side up.
By the time your are finished the paper in the middle forming the body of the butterfly becomes so thick that its difficult to make further folds and it may rip so take care while folding it.
Video:-
| Model | : Origami Alice Gray Butterfly |
| Design | : Michael LaFosse |
| Complexity | : Medium |
| Folding Instruction | |
| Diagram | : Diagram by J.C Nolan |
| Book | : Advanced Origami |
| Video | : Origamiancy |
| Paper | : 9*9 inch one side coloured paper. |

Earlier I had tried Michael LaFosse's Alexandar swallowtail butterfly .The instruction for this butterfly was available on the website by Michael LaFosse.
There were many more wonderful butterflies modeled by Michael Lafosse which I wanted to fold but could not find the instruction online neither I am that good at following the diagrams.Finally after one and a half years of folding Alexander swallowtail butterfly I found this video on YouTube by origamiancy for the model Alice Gray Butterfly by Michael Lafosse.The video was up by 2009 and I found it now that show how good I am at searching things on internet.
The instructions are quite clear.One thing to take care of ,is the instructions in the video starts with colour side up but if you want your butterfly to be colourful then start with White side up.
By the time your are finished the paper in the middle forming the body of the butterfly becomes so thick that its difficult to make further folds and it may rip so take care while folding it.
Video:-
Wednesday, May 4, 2011
Origami High Heel shoes - 1
Day 152 - Origami High Heel shoes - 1

Yesterday it was a 2D High Heel shoes which I wasn't that happy to fold so today here is another version of the high heel shoe which I found on YouTube.Though there are a lot of high heel shoes video on YouTube most of them are too fast to follow.This video is fast too but kind of better than others.You need to have real Patience to stop the video every now and then to follow the instructions but the end result is worth it.

This one is a 3D model which looks like the barbie high heel shoes.
Video:-
| Model | : Origami High Heel shoes - 1 |
| Complexity | : Medium |
| Folding Instruction | |
| Video | : okakuku |
| Paper | :3*3 inch one side coloured square |

Yesterday it was a 2D High Heel shoes which I wasn't that happy to fold so today here is another version of the high heel shoe which I found on YouTube.Though there are a lot of high heel shoes video on YouTube most of them are too fast to follow.This video is fast too but kind of better than others.You need to have real Patience to stop the video every now and then to follow the instructions but the end result is worth it.

This one is a 3D model which looks like the barbie high heel shoes.
Video:-
Tuesday, May 3, 2011
Origami Heel Shoes
Day 151 - Origami Heel Shoes

Origami Heel shoes starts with a kite base.I would suggest to make it with a smaller paper instead of a big one.Though the model is 3D its better to be called a 2D as you can flatten and stick it on cards.If kept a 3D model it stands and gives a 3D view in the front view only .

| Model | : Origami Heel Shoes |
| Design | : Traditional |
| Complexity | : Simple |
| Folding Instruction | |
| Diagram | : Origami-club |
| Paper | :3*3 inch one side coloured square |

Origami Heel shoes starts with a kite base.I would suggest to make it with a smaller paper instead of a big one.Though the model is 3D its better to be called a 2D as you can flatten and stick it on cards.If kept a 3D model it stands and gives a 3D view in the front view only .

Monday, May 2, 2011
Origami Basket
Day 150 - Origami Basket
It's cute little basket which can be made in a very little amount of time.The model requires glue to fix the handle.Its made out of single square piece of paper.

| Model | : Origami Basket |
| Design | : Traditional |
| Complexity | : Simple |
| Folding Instruction | |
| Photo instruction | : Orgami Mommy |
| Paper | :3*3 inch contrast coloured square |
It's cute little basket which can be made in a very little amount of time.The model requires glue to fix the handle.Its made out of single square piece of paper.
Sunday, May 1, 2011
Origami Penguin by Jo Nakashima
Day 149 - Origami Penguin by Jo Nakashima
One more from Jo Nakashima.A wonderful 3D penguin .This one is bit difficult but not too tough.The tough part is the precrease.One needs to have a lot of patience ( of course I have very little patience which is evident from the penguin I have folded).
Only suggestion is do start with a big piece of paper else it becomes difficult to follow the creases.
| Model | : Origami Penguin by Jo Nakashima |
| Design | : Jo Nakashima |
| Complexity | : Difficult |
| Folding Instruction | |
| Video | : Jo Nakashima |
| Paper | :15 * 15 cm one side coloured square |
One more from Jo Nakashima.A wonderful 3D penguin .This one is bit difficult but not too tough.The tough part is the precrease.One needs to have a lot of patience ( of course I have very little patience which is evident from the penguin I have folded).
Only suggestion is do start with a big piece of paper else it becomes difficult to follow the creases.

Saturday, April 30, 2011
Origami Maple Leaf
Day 148 - Origami Maple Leaf
A very simple model for maple leaf .It uses the standard Origami bird base.The flaps of the bird base are turned into the leaf.
You would need a small piece of paper and a little glue to make the stem attached to the leaf.
| Model | : Origami Maple Leaf |
| Design | : Traditional |
| Complexity | : Simple |
| Folding Instruction | |
| Diagram | : Origami-club |
| Animation | : Origami-club |
| Paper | :3*3inch one side coloured square |
A very simple model for maple leaf .It uses the standard Origami bird base.The flaps of the bird base are turned into the leaf.
You would need a small piece of paper and a little glue to make the stem attached to the leaf.

Friday, April 29, 2011
Origami Tote Bag
Day 147 - Origami Tote Bag
Origami Tote Bag is a kirigami model as you need to cut for bringing out the handle of the bag.Its a simple model with hardly a 5 to 6 steps.
Use stiffer paper if you want to use it as a bag and also add a little glue to fix the final fold.You can use flowers to decorate it too or make it out of patterned paper.
| Model | : Origami Tote Bag |
| Complexity | : Simple |
| Folding Instruction | |
| Diagram | : Origam-club |
| Animation | : Origami-club |
| Photo instruction | : Origami-instructions.com |
| Paper | :3*3 one side coloured square paper |
Origami Tote Bag is a kirigami model as you need to cut for bringing out the handle of the bag.Its a simple model with hardly a 5 to 6 steps.
Use stiffer paper if you want to use it as a bag and also add a little glue to fix the final fold.You can use flowers to decorate it too or make it out of patterned paper.

Thursday, April 28, 2011
Origami rose - 1
Day 146 - Origami Rose - 1
One more of the roses.As I was never so successful with the standard rose models I always try to make some different formats of rose like the modular ones.
This is a modular rose with 8 units made of square paper.The units are interlocked by the inbuilt pockets
The units need the simple kite base just that the left flap is folded back.Use both side same coloured paper.3 units are first arranged to make the bud and the rest 5 to make the outer circle.The petals are bit rolled to give them the flower look.
| Model | : Origami Rose 1 |
| Complexity | : Simple |
| Folding Instruction | |
| Photo instruction | : stranamasterov.ru |
| Paper | : 8 squares of 3*3 inch Post-it note |
 |
| Units made of 1/4 of 3*3 inch Post-it note |
One more of the roses.As I was never so successful with the standard rose models I always try to make some different formats of rose like the modular ones.
This is a modular rose with 8 units made of square paper.The units are interlocked by the inbuilt pockets
 |
| 3*3 inch Post-it note units |
The units need the simple kite base just that the left flap is folded back.Use both side same coloured paper.3 units are first arranged to make the bud and the rest 5 to make the outer circle.The petals are bit rolled to give them the flower look.
 |
| Both large and small rose |
Wednesday, April 27, 2011
Origami kusudama - 1
Day 141,142,143,144,145 - Origami kusudama - 1
This is a cute model but the number of units make it a bit scarry .Ok its not that tough neither it takes as long as I have taken .It's easy model with a lot of gluing.As I was busy with other work it took me longer to complete the model.
The model needs both side coloured square paper of varying size.The electra units and petals can be of same size.As mentioned above I have used 1/4 of 3*3 inch post it notes for the electra units and petals and 3*3 inch post-it notes for the sepals.
Electra makes a good base for the kusudama where you stick on the flowers using glue ,so a lot of gluing.The sepals have similar folding as the iris flower with a little use of scissors so you may say its kirigami.The petals are the easiest to fold of the three.
If you notice carefully its a lotus and would look like a perfect lotus if you add few more layers of petals.
| Model | : Origami Kusudama-1 |
| Complexity | : Medium |
| Folding Instruction | |
| Diagram and Video | : Paper world Mary |
| Paper | : Total units :138 |
| Electra as base | : 30 units :1/4th of 3*3 inch post-it note |
| Sepals | : 12 units :3*3 inch Post-it note |
| Petals | : 96 (8 per flower)units: 1/4th of 3*3 inch post-it note |
This is a cute model but the number of units make it a bit scarry .Ok its not that tough neither it takes as long as I have taken .It's easy model with a lot of gluing.As I was busy with other work it took me longer to complete the model.
The model needs both side coloured square paper of varying size.The electra units and petals can be of same size.As mentioned above I have used 1/4 of 3*3 inch post it notes for the electra units and petals and 3*3 inch post-it notes for the sepals.
Electra makes a good base for the kusudama where you stick on the flowers using glue ,so a lot of gluing.The sepals have similar folding as the iris flower with a little use of scissors so you may say its kirigami.The petals are the easiest to fold of the three.
If you notice carefully its a lotus and would look like a perfect lotus if you add few more layers of petals.
 |
| Electra as base |
 |
| Flowers to be added to the kusudama |
 |
| Completed Kusudama |
Friday, April 22, 2011
Origami Electra
Day 138,139,140 - Origami Electra
Origami Electra Icosidodecahedron Kusudama is designed by David Mitchell.This model requires 30 modules made out of square sheets and the modules have in built pockets which help in assembly.
Though Origami Electra looks tough to build and some what like some chemistry molecular structure but trust me it's not that tough and this model can be used as base for many other kusuduma.
In fact I actually went on building this model to make the base for my next kusudama.I had seen this model earlier but never felt like building it as due to the complex look.
I have used 1/4 of 3*3 Inch post-it notes as I wanted to make a small model.Assembly is done using glue( the model assures that the inbuilt pockets are good enough to keep the pieces together ) as my units were small and I didn't want to take a risk.
Use both side coloured paper for the model.
Video :-
| Model | : Origami Electra |
| Design | : David Mitchell |
| Complexity | : Medium |
| Folding Instruction | |
| Diagram | : Part 1 Part 2 |
| Book | : Paper Crystals Enchanting Ornaments Folding |
| Video | : "How to make these !! " by barbabellaatje |
| Paper | :1/4 of 3*3 inch post-it note |
Origami Electra Icosidodecahedron Kusudama is designed by David Mitchell.This model requires 30 modules made out of square sheets and the modules have in built pockets which help in assembly.
Though Origami Electra looks tough to build and some what like some chemistry molecular structure but trust me it's not that tough and this model can be used as base for many other kusuduma.
In fact I actually went on building this model to make the base for my next kusudama.I had seen this model earlier but never felt like building it as due to the complex look.
 |
| Origami Electra |
I have used 1/4 of 3*3 Inch post-it notes as I wanted to make a small model.Assembly is done using glue( the model assures that the inbuilt pockets are good enough to keep the pieces together ) as my units were small and I didn't want to take a risk.
Use both side coloured paper for the model.
Video :-
Monday, April 18, 2011
Origami Humming Bird
Day 137 - Origami Humming Bird
I have seen a lot of origami humming birds but the best one is the one by Robert J lang.Though that model looks very tough to me I found this simple humming bird on Origami Spirit.
This Origami Humming Bird model is designed by Andrés Plazas of Colombia.It starts with an origami bird base.Basically its the same old crane but with few manipulations you can get the humming bird.

Video :-
| Model | : Origami Humming bird |
| Design | : Andrés Plazas |
| Complexity | : Simple |
| Folding Instruction | |
| Video | : Youtube channel Pozamansa |
| Paper | : 3*3 inch one side coloured square |
I have seen a lot of origami humming birds but the best one is the one by Robert J lang.Though that model looks very tough to me I found this simple humming bird on Origami Spirit.
This Origami Humming Bird model is designed by Andrés Plazas of Colombia.It starts with an origami bird base.Basically its the same old crane but with few manipulations you can get the humming bird.

Video :-
Sunday, April 17, 2011
Origami cat by Roman Diaz
Day 136 - Origami cat by Roman Diaz
This model needs a rectangle to start with.I found diagram as well as video instruction for the model but I found the diagram better. I know its sounds strange when I say diagram is better because I never liked following the diagrams,but this time I found the diagram easier.
After few failed attempts on folding the model I was somewhat successful with the model.My model doesnot stand properly though it should have.Also I could not get the finer details properly like whiskers though the cheeks came out properly and many more finer details.
| Model | : Origami cat by Roman Diaz |
| Design | : Roman Diaz |
| Complexity | : Difficult |
| Folding Instruction | |
| Diagram | : www.origamichile.cl |
| Video | : Benjingling |
| Paper | : Rectangle Half of 4.5 Inches square |
This model needs a rectangle to start with.I found diagram as well as video instruction for the model but I found the diagram better. I know its sounds strange when I say diagram is better because I never liked following the diagrams,but this time I found the diagram easier.
After few failed attempts on folding the model I was somewhat successful with the model.My model doesnot stand properly though it should have.Also I could not get the finer details properly like whiskers though the cheeks came out properly and many more finer details.
 |
| One of the failed attempts |
 |
| Finally something near abt the model.I am exhausted ! Uff... I am not trying any more kitty. |
Saturday, April 16, 2011
Origami cat by Gilad Aharoni
Day 135 - Origami cat by Gilad Aharoni
I tried following the diagram but was lost midway.It seems I am really bad at following diagrams so I searched for the video instructions and luckily I found one on Marigami's channel on YouTube.
After trying so many cute cats this one does not look so cute .I found the cat face to be the toughest in the whole model,especially while making the eyes and nose.
One should start with a big paper else its really difficult to make the face.

| Model | : Origami cat by Gilad Aharoni |
| Design | : Gilad Aharoni |
| Complexity | : Medium |
| Folding Instruction | |
| Diagram | : www.Giladorigami.com |
| Video | : Marigami |
| Paper | : 4.5 Inches |
I tried following the diagram but was lost midway.It seems I am really bad at following diagrams so I searched for the video instructions and luckily I found one on Marigami's channel on YouTube.
After trying so many cute cats this one does not look so cute .I found the cat face to be the toughest in the whole model,especially while making the eyes and nose.
One should start with a big paper else its really difficult to make the face.

Friday, April 15, 2011
Origami Cat - 3
Day 134 - Origami Cat-3
It can be treated as a 2D as well as 3D model as it can stand too. It requires 2 squares,one each for head and body.You can assemble using glue or just tuck the body part into the pocket created in the head even though that would be very frail assembly but that's an option.
Good model for card making.

| Model | : Origami Cat-3 |
| Complexity | : Simple |
| Folding Instruction | |
| Video | : About.com |
| Paper | : 1/4 of 3*3 Inch one side coloured square paper . 2 square papers |
It can be treated as a 2D as well as 3D model as it can stand too. It requires 2 squares,one each for head and body.You can assemble using glue or just tuck the body part into the pocket created in the head even though that would be very frail assembly but that's an option.
Good model for card making.

Thursday, April 14, 2011
Origami Cat-2
Day 133 - Origami Cat-2
It's turning out to be a origami cat week,though I didn't search the models intentionally but found them interesting and moreover easy.
It's a 2D model. I stumbled upon this cat model on a card making site called Card Making @ CircleOfCrafters.com.This cat requires 3 square papers .one each for face,body and tail.
The units are to be assembled using glue.

| Model | : Origami Cat-2 |
| Complexity | : Simple |
| Folding Instruction | |
| Photo Instructions | : Card Making @ CircleOfCrafters.com |
| Paper | : 3*3 Inch one side coloured square paper . 3 square papers |
It's turning out to be a origami cat week,though I didn't search the models intentionally but found them interesting and moreover easy.
It's a 2D model. I stumbled upon this cat model on a card making site called Card Making @ CircleOfCrafters.com.This cat requires 3 square papers .one each for face,body and tail.
The units are to be assembled using glue.

Wednesday, April 13, 2011
Origami Cat-1
Day 132 - Origami Cat-1
This is a cute little cat .I traced this model from the website www.origamispirit.com.This model is created by Hiroaki Takai but the page has 2 little cat models of which one is modified form of the model by Hirokai.I could fold only the one diagrammed by Hiroaki as the other one does not have a diagram there nor do I have that much imagination to manipulate and create it.
This model needs a rectangle.You can get that by dividing your regular square in half. Preferable to use both side same coloured paper for the model.One needs to be careful while shaping the ears of the cat else its an easy model.

| Model | : Origami Cat-1 |
| Design | : Hiroaki Takai |
| Complexity | : Simple |
| Folding Instruction | |
| Diagram | : Diagramed by Hiroaki Takai |
| Paper | : Post-it notes.Rectangle |
This is a cute little cat .I traced this model from the website www.origamispirit.com.This model is created by Hiroaki Takai but the page has 2 little cat models of which one is modified form of the model by Hirokai.I could fold only the one diagrammed by Hiroaki as the other one does not have a diagram there nor do I have that much imagination to manipulate and create it.
This model needs a rectangle.You can get that by dividing your regular square in half. Preferable to use both side same coloured paper for the model.One needs to be careful while shaping the ears of the cat else its an easy model.

Tuesday, April 12, 2011
Origami Cat Nap
Day 131 - Origami Cat Nap
Origami Cat nap is based on Origami fish base.As I am really bad at following diagrams only I serached for video instructions and found none .Most of the pplaces where I found the diagram it was incomplete.
It was in origami.happymagpie.com that I found the complete diagram.
Somehow I managed following the diagram( even though the author is so clear in the diagram ) and made my cute little cat nap model.As the paper I choose was too stiff the cats tail kept on going away from the intended position so I cheated a little and used glue to keep it in place :D.
Here's my cat nap model.

| Model | : Origami Cat Nap |
| Design | : Philip Schulz |
| Complexity | : Medium |
| Folding Instruction | |
| Diagram | : Diagramed by Philip Schulz |
| Paper | : 4.5 Inches |
Origami Cat nap is based on Origami fish base.As I am really bad at following diagrams only I serached for video instructions and found none .Most of the pplaces where I found the diagram it was incomplete.
It was in origami.happymagpie.com that I found the complete diagram.
Somehow I managed following the diagram( even though the author is so clear in the diagram ) and made my cute little cat nap model.As the paper I choose was too stiff the cats tail kept on going away from the intended position so I cheated a little and used glue to keep it in place :D.
Here's my cat nap model.

Monday, April 11, 2011
Origami cat
Day 130 - Origami Cat
This one is simple only for the part where you crease - open and refold to get the body and the tail.
I found the instructionson youtube on a channel by super1600.The video instructions are good to follow but one needs to be really careful and make crisp folds to get the exact model also certain places the folds dont seem clear as they are very small folds and the paper colour is reflecting making it tough to understand the fold.

| Model | : Origami Cat |
| Complexity | : Medium |
| Folding Instruction | |
| Diagram | : www.giladorigami.com |
| Video | : Super1600 |
| Paper | : 3*3 Inch one side coloured square paper |
This one is simple only for the part where you crease - open and refold to get the body and the tail.
I found the instructionson youtube on a channel by super1600.The video instructions are good to follow but one needs to be really careful and make crisp folds to get the exact model also certain places the folds dont seem clear as they are very small folds and the paper colour is reflecting making it tough to understand the fold.

Subscribe to:
Posts (Atom)